OK, so I *think* I’m done with the Christmas decorating. When it comes to seasonal decorating, I have a slight problem, in case you haven’t noticed by now. I have to make a full stop; otherwise, I could keep going until the 25th! But then I’d have way too much to take down later. Plus, I have to move on to a million other things on my Christmas to-do list. Like, for example, I haven’t wrapped a thing yet. Nodda. I like decorating so much more than wrapping.
So tonight, to procrastinate on the wrapping a little longer
, I thought I’d pull together a summary of all the random Christmas decorating blog posts that I’ve shared over the past month. In the home decor blogging world, that kind of blog post is usually called a “Holiday Home Tour”. That label is a little misleading in my case. I am only going to show you the areas of my home that are presentable at the moment. Unlike a real home tour, I’m going to shield you from the mess of Christmas bins (and glitter) that still needs to be put away!
The Porch
Our front porch is decorated with real greenery, white lights and traditional Christmas colors. I usually stick to red out there because it’s such a festive color, and is easily seen from a distance. For the first time in a decade, I also used some gold in my Christmas decor this year.
The gold and red polka dot ribbon that I used is traditional, but fun. I’m a big fan of polka dots!
Earlier in the month, I posted a tutorial on how to makeover an old artificial wreath, and create the look of real greenery using just a few sprigs of cedar.
The Tree
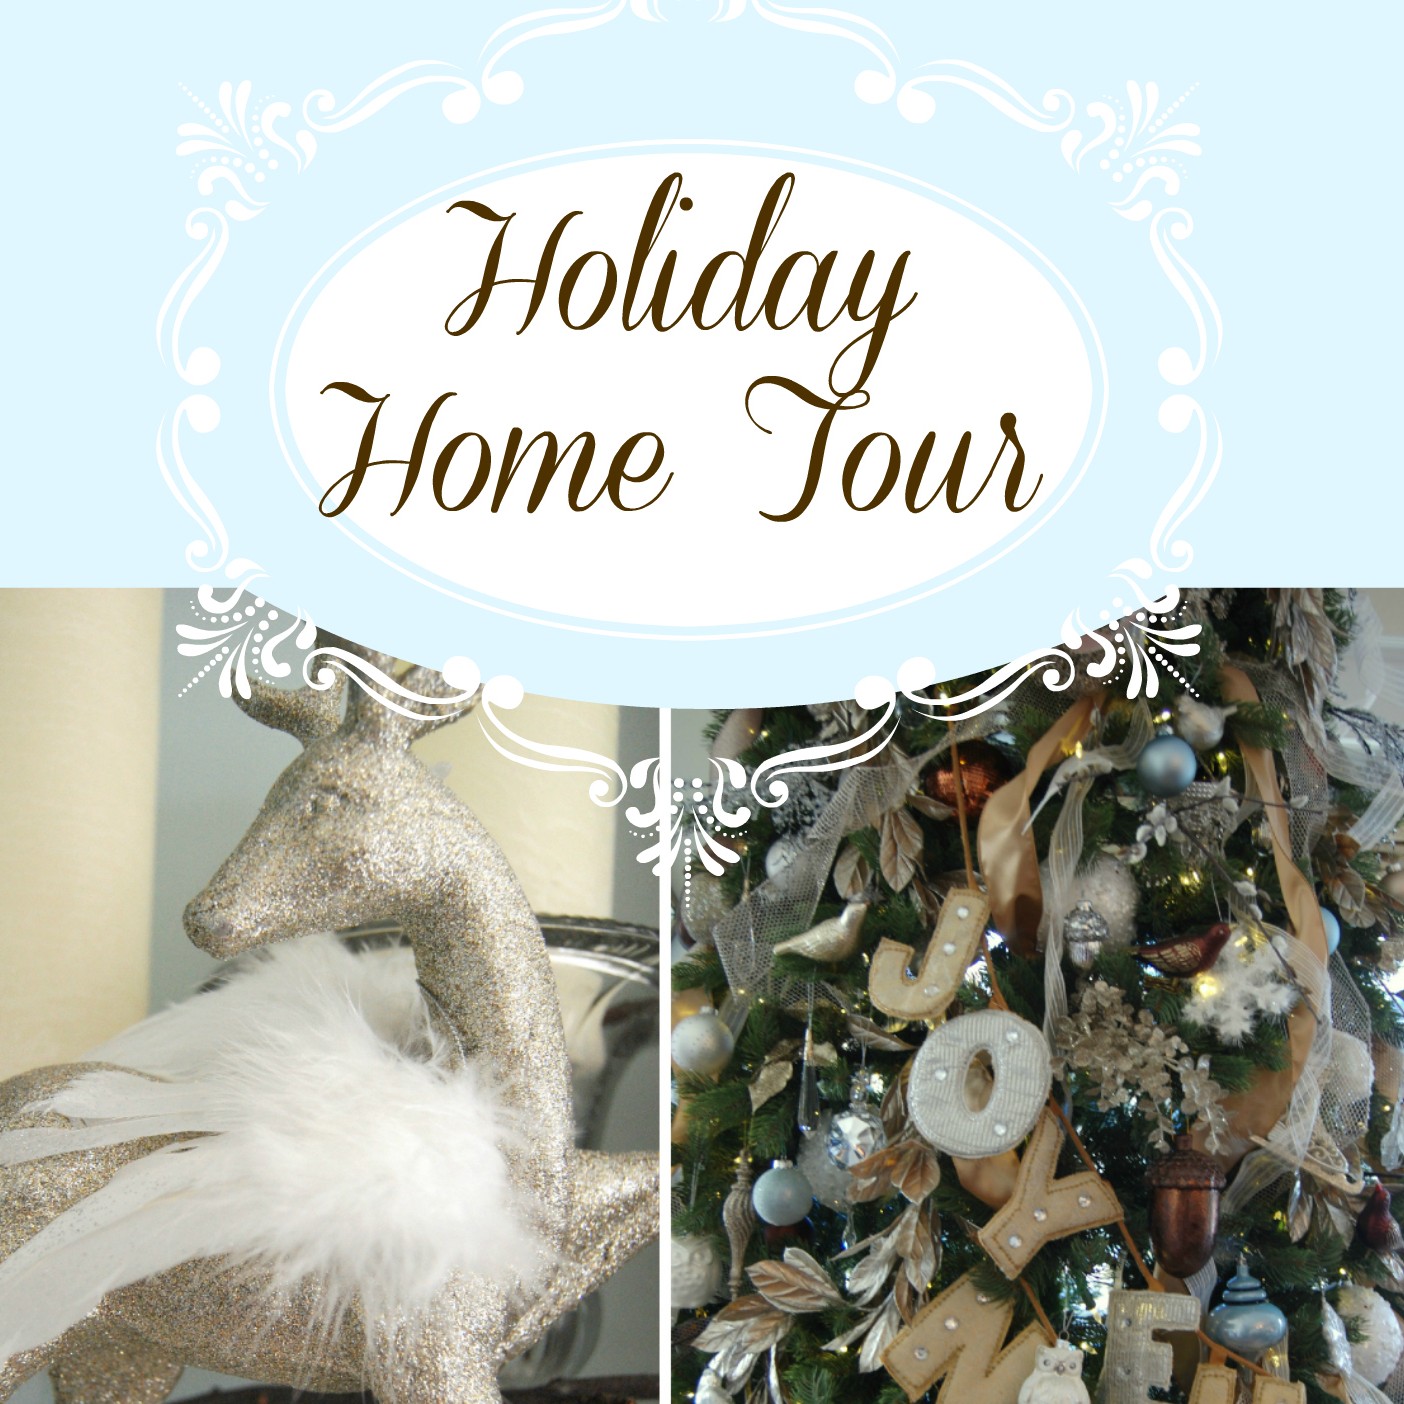
Our Christmas tree sits right in the center of our open concept Living Room / Kitchen area. For the first time, I decorated a 100% neutral Christmas tree this year, using champagne, white / cream and chocolate brown.
I also gave a little Christmas decorating tip / tutorial on how I added ribbon to my Christmas tree, which was a little different than in previous years. Last year, my tutorial on how to decorate a Christmas mantel (including how to add ribbon to a Christmas mantel) was really popular, so I thought this might be helpful too!
Our 100% neutral tree only lasted a few days! “Neutral”became “bleu-tral” when I added a pop of muted blue to the tree. It still feels pretty neutral, but the touch of blue blends so much better with the room.
The Foyer
I carried the primary tree colors of champagne and blue through my other Christmas decorating on the main floor. The bannister on our staircase in the foyer is decorated with greenery, ribbon and glass bulbs.
This little tray of shiny baubles sits on our foyer table. None of them are breakable. Believe me, with 3-year old twin boys in the house, they’ve been tested once or twice!
The Living Room / Dining Area
A similarly muted color scheme can be found in our open concept living room / dining area too. I blogged about our Christmas mantel, decorated with branches and bulbs and glittery reindeer, a few weeks ago.
Since then, I’ve hung our stockings, and added some feathery angel wings to the reindeer!
I also hung some some pretty glass bulbs from the chandelier in the living room.
And, here’s a little vignette of foliage and ‘floating’ bulbs that I added atop a cabinet in the room.
You can see how our tree is just behind the post in our living room.
In our dining area, I put together this vase as a centerpiece for the table. I started with faux snow, then added white feathers and glass bulbs, and ended off with a glittery nest and bird. It has some battery-operated tea lights on the tray, so it really sparkles at night!
This Christmas sign that I created, based on a quote from Scrooge, is on top of our hutch. (If you’d like to make your own, you can find that free Christmas printable here!) I also filled up two rustic birdcages with sparkly Christmas bulbs and white lights. (Last year, they were filled with red and turquoise Christmas bulbs, so its quite a change in color scheme!)
The TV Room Tree
I haven’t posted anything yet about this mini-tree in our TV room. Our TV has a bit more color than the rest of the main floor (some red)…
…so it could take a little more saturated color than our living room area. We decorated a fun little “Christmas cookie” tree. I’ve been collecting these decorations for years. Last year, this tree was in the kitchen. It’s filled with gingerbread men, shortcake cookies, and peppermint candy ornaments! Our Elf, Henrie Rouge, must have thought this cookie was real because we found him trying to munch on it this morning! As long as our 3-year old boys don’t try to eat one, we’re good!
The Basement Playroom / Family Room
A little earlier today, I posted about our Dr. Seuss Tree, which I first created last year. Last Christmas, I created most of the Dr. Seuss decorations myself. (You can find a tutorial on how to make these Dr. Seuss decorations here.) I didn’t make anything new for it this year, but I did add some new Dr. Seuss ornaments that I was given last year. If you’d like to see the tree in more detail, just click over to that post: Our Dr. Seuss Tree! 2012.
Miss G’s Green & Pink Girly Tree
This year, our 8-year old daughter graduated from her pretty ballerina mini-tree to a 6-foot tree. The lights on her mini-tree no longer worked, and we just happened to come across this heavily marked-down white tree (swoon) at our local Zellers Store (Canadian). (FYI, in case you weren’t aware, Zellers is is closing down soon as it’s been bought by Target.) I thought it might be a little big for her space, but it actually fits nicely!
I haven’t posted about this pink, girly tree yet, so I’ll try and do a post next week to show you a few more details – including how to make a blinged-out monogram tree topper!
Whew! I’m exhausted just talking about all that decorating! Forget what I said earlier: I am definitely DONE with decorating this Christmas!
I hope you enjoyed the tour! Many blessings for a wonderful holiday season, however you celebrate it!
(Oh, and you can click here, if you’d like to see last year’s “Red & Turquoise” Holiday House Tour!)
Until next time,
P.S. I’m linking up to…
*This linky party can also be found at Cottage Magpie!
Pin ItThanks so much for all the awesome feedback my Dr. Seuss Christmas Tree. (If you haven’t seen it yet, you might want to check out the post My Dr. Seuss Christmas Tree first). It’s been so cool to hear how the tree makes people smile. I guess that the whimsical images and the silly prose just brings out the kid in all of us!
I had so much flipping fun making the decorations. It really was a joy.
As Dr. Seuss himself said,
“I like nonsense; it wakes up the brain cells!”
So, in case you need more nonsense in your life this Christmas, I’m going to give you a closer look at how to make your own Dr Seuss decorations. There are soooo many decorations stuffed into that tree, but for the purpose of the tutorial, I’ve tried to group them as best I can!
Dr. Seuss Book Cover ‘Felt Series’:
I posted about these awhile back, but in case you missed it…
What you’ll need:
- Tub of official Dr. Seuss foamies (Michaels).
- Felt – turquoise, oatmeal, red.
- Buttons – bright colors.
- Red and white striped grosgrain ribbon.
- Craft glue.
- Pinking shears.
How to make them:
- Start by cutting your felt (steps 1 & 2 above). You’ll need rectangles in two different colors for each decoration. Cut one slightly larger than the other. I used my pinking shears to add a little more detail.
- Then use a good craft glue to adhere the pieces together (step 3).
- The foamies are self adhesive and they stick really well to the felt (step 4).
- Next, add some cute buttons with glue (step 5).
- Let dry and glue the whole thing to a piece of ribbon (step 6).
To hang on the tree, just use a regular ornament hanger, and poke it through the ribbon.
Dr. Seuss Book Page-Mod Podge Series
In this series of decorations, I moved away from the foamies, and used paper images from books. Now, let me tell you that I had full intentions of cutting up a couple of our old duplicate Dr. Seuss books for this project.
But all it took was one snip and the guilt set in! Don’t ask me why; I guess I’m just a book geek like that. I just couldn’t do it!! So I ended up buying a Dr. Seuss novelty / activity book at Michael’s instead. The images in this book were much brighter and more vivid anyway.
What you’ll need:
- Wooden slats or scraps
- Felt
- Mod Podge
- Dr. Seuss Books
- Scrapbook paper
Any time there’s mod podge involved, prepare to get messy!
I started by cutting the random images I liked from Dr Seuss novelty books. Some of them couldn’t be cut in rectangles (because of other things on the page), so I simply cut around the image in random shapes. The quirkier, the better!
Next, I cut some polka dot scrap-paper to the dimensions of the wooden slat and pasted it on. Then I layered on the image with mod podge, and added some additional scraps here and there for fun. (You might notice, I added a little red glitter to my mod podge to make it sparkle!)
Finally, I used my glue gun to adhere satin turquoise ribbon, and to add some fun embellishments.
There are no rules here. Be as creative as you want!
Finally, I had a few images that were too big for my wooden slats, so I thought I’d try mod podging them to felt. Guess what? It worked perfectly! It just took a little longer to dry as the felt gets pretty soaked with mod podge.
And finally…Dr. Seuss’s Hat & Bow-Tie!
Finally, here’s how I ‘made’ the tree’s crowning jewel – the Cat in the Hat glittery hat and bow-tie.
I started with a Cat in the Hat costume hat and bow-tie, which cost me about $15. I went this route since I’m not a sewer, but if you are, I bet you could whip one up in no time. The only problem was that it looked like a costume (understandable, considering that it was one, lol). The fabric was flimsy and cheap. So I decided to give it some sparkle and structure by applying red glitter.
I ‘painted’ mod podge on over the red stripes, then brushed on red glitter with another paint brush. (I used Romantic Red glitter from Stampin Up, but I’m sure any one would do).
I’ll warn you, it was messy! I covered my island in paper, and used it to mix the sparkles around in the mod-podge covered brush. To dry the hat, I simply set in down over my paper towel holder! Within a couple of hours, it was dry and ready for the tree!.
Now, repeat the process with the bow-tie!
So…are you now ready to make your own Dr. Seuss Christmas decorations?
For lots more details and pics on The Dr. Seuss Tree, hop over here.
What are you waiting for?
Today is your day!
Your mountain is waiting.
So… get on your way.
~Dr. Seuss
Until next time, keep rhyming and glittering!
~ Kerri
P.S. I’m linking up with…
It seems like I’ve been talking on and on around here lately about my Dr. Seuss Christmas tree decorations…so much so, that I think it deserves to be capitalized: so, from here on in, it shall be The Dr. Seuss Tree. Well, The Dr. Seuss Tree is finally finished, and I couldn’t be happier with it.
I think I mentioned in an earlier post that I was originally inspired last year by Donna’s Whoville tree over at Funky Junk. Gosh how I loved that tree! The first time I saw it, a light bulb went off, and I knew that I HAD to do a Dr. Seuss-themed tree for my kids’ play area this year. The Funky Junk tree was the idea starter, but I my vision was a little different. While Donna’s tree was chock full of awesome things one might find in the Grinch’s lair; I imagined a fun, colorful tree full of whimsical characters, like the Cat in the Hat and Cindy Lou Who.
I found it hard to find Dr. Seuss ornaments that weren’t crazy expensive, so I decided to make most of the decorations myself. I figured it would be more special to my kids that way, anyway. So I’ve been collecting, and cutting, and pasting, and glittering and mod podging and glue gunning for weeks now.
And, tada!
I present to you…The Dr. Seuss Tree.
The red and white striped sinamay was such a lucky find! Thank you Hallmark!
I especially love this Thing 1 and Thing 2 ornament I made since we have twin boys…
Most of my handmade decorations were made from old books, paper, felt, wood, foamies and mod podge.
In another stroke of luck, I found these awesome Cat in the Hat like hats at Pier One this year.
I also splurged on a few collector ornaments like this one of Cindy Lou Who.
We’ll just add to our collection over time.
There are about 12 different book cover decorations like this one throughout the tree…
These totally awesome red and white striped furry orbs also came from Pier One.
(Gee, Pier One really had my back this year, didn’t they? LOL)
But wanna know the VERY best part?!?
The Dr. Seuss Tree is wearing a hat and bow-tie!
EEEEEK!
(Seriously, people, this tree makes me feel all giddy and kid-like!)
I was on the hunt for a genuine Cat in the Hat hat for this tree for months.
And, guess where I found it?
It was the very last one on the rack in the costume section at FAO Schwartz on my trip to NYC last weekend!
Could anything be more meant to be?
I also made this Grinch word art for my downstairs mantel. There really are some super lessons in the Grinch.
Now, the big question is…how do I get my own Thing 1 and Thing 2 to keep their hands off a tree that’s so very inviting to 2-year old boys?? I guess I’d better enjoy it’s glory while it lasts!
Want to know how I made some of these ornaments? I’ll be posting a few follow ups with tutorials in the coming days! So check back soon!
Until next time, happy decorating!
Kerri
Post-Script: To see how I made these Dr. Seuss decorations, pop over to the post: How to Make Dr. Seuss Christmas Tree Decorations: A Tutorial!
Post-Script #2: The Dr. Seuss Tree was featured at the CSI Project and at Hooked on Houses!

Halloween is over, and my decorations are already getting packed away for another year.
You know what that means don’t ya? Yup, next up: Christmas!
Although Christmas decorating is my weakness, I will try and show some self-control, and hold off on any holiday decorating for at least another 3-4 weeks. But I can still talk about it, right? (For whatever reason, I know some people get all squeamish about talking about Christmas too early. I’m NOT one of those people, lol.)
This year, we’re going to have a second tree for the first time in awhile. We recently developed our basement space in our new home, and that means we finally have space again for a fun ‘kid tree’.
Well, last Christmas, I fell in love with Funky Junk Donna’s “Who-ville” tree. Did you see it? It was a fan-tab-u-lous display of Grinch-like ‘stuff’ – adorned with rusty gears, old license plates and treasured family relics. It even had the characteristic Who-ville swoop at the top!
Well, The Grinch is little Miss G’s absolute favorite Christmas movie. During the season, we watch it over and over and giggle each time like it was our first. So when I saw Donna’s Who-ville tree, I knew I’d somehow have to create my very own Dr. Seuss-inspired version. Less funky junk, and more Cat in the Hat. Of course Mr. Grinch will be included, but I also imagined pulling in some other Dr. Seuss characters and colors!
I’ve been collecting ideas and ornaments ever since. Yes, ever since last Christmas, I’ve been imagining this tree. (I swear the more I think about it I really should have called my blog “The Decorating Geek”!)
I’ve got so many ideas on how to use these Dr. Seuss foamies (from Michaels) that my head might explode! The package even includes all the book covers! BTW, did you know that there was a Dr. Seuss book called “Sneetches”? You learn something new every day!
Anyway, I am totally excited about pulling it together. I hope it turns out like I imagined, and that the kiddies will like it as much as me, lol. (Oh, and I also hope that my two-year twin boys won’t destroy it!)
So are you getting excited about the Christmas season, or are you one of THOSE people who’d rather not think about it until December?!?
Have a great night.
~Kerri
Post-Script: To see how the tree turned out, click over to How to Make Dr. Seuss Christmas Tree Decorations: A Tutorial!
Welcome to A Pop of Pretty, a Canadian home decorating blog that chronicles my love of home decor and pretty things. I'm out to prove (mostly to myself!) that a pretty home is still possible amid the circus of 3 young kids, including twin toddlers. {More...}Subscribe via RSS…
or Subscribe via e-Mail
Click here for e-mail subscription form.


Archives

Here’s what’s trending (last 48 hrs):
-


Canadian House and Home Blog
Close preview
Loading...Centsational Girl
Close preview
Loading...Dear Lillie
Close preview
Loading...Funky Junk Interiors
Close preview
Loading...Miss Mustard Seed
Close preview
Loading...Nesting Place
Close preview
Loading...Southern Hospitality
Close preview
Loading...The Inspired Room
Close preview
Loading...The Lettered Cottage
Close preview
Loading...The Stories of A to Z
Close preview
Loading...The Yellow Cape Cod
Close preview
Loading...Young House Love
Close preview
Loading...


