

This post was most recently updated on September 22nd, 2019
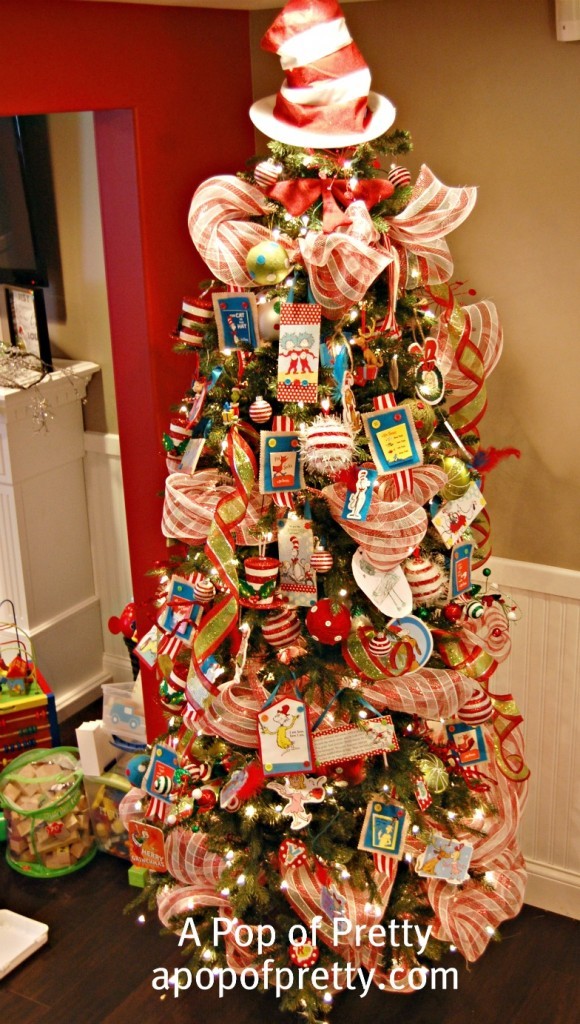
Thanks so much for all the awesome feedback my Dr. Seuss Christmas Tree. (If you haven’t seen it yet, you might want to check out the post My Dr. Seuss Christmas Tree first). It’s been so cool to hear how the tree makes people smile. I guess that the whimsical images and the silly prose just brings out the kid in all of us!


I had so much flipping fun making the decorations. It really was a joy.
As Dr. Seuss himself said,
“I like nonsense; it wakes up the brain cells!”
So, in case you need more nonsense in your life this Christmas, I’m going to give you a closer look at how to make your own Dr Seuss decorations. There are soooo many decorations stuffed into that tree, but for the purpose of the tutorial, I’ve tried to group them as best I can!
Dr. Seuss Book Cover ‘Felt Series’:


I posted about these awhile back, but in case you missed it…
What you’ll need:
- Tub of official Dr. Seuss foamies (Michaels).
- Felt – turquoise, oatmeal, red.
- Buttons – bright colors.
- Red and white striped grosgrain ribbon.
- Craft glue.
- Pinking shears.


How to make them:
- Start by cutting your felt (steps 1 & 2 above). You’ll need rectangles in two different colors for each decoration. Cut one slightly larger than the other. I used my pinking shears to add a little more detail.
- Then use a good craft glue to adhere the pieces together (step 3).
- The foamies are self adhesive and they stick really well to the felt (step 4).
- Next, add some cute buttons with glue (step 5).
- Let dry and glue the whole thing to a piece of ribbon (step 6).
To hang on the tree, just use a regular ornament hanger, and poke it through the ribbon.


Dr. Seuss Book Page-Mod Podge Series
In this series of decorations, I moved away from the foamies, and used paper images from books. Now, let me tell you that I had full intentions of cutting up a couple of our old duplicate Dr. Seuss books for this project. 

What you’ll need:
- Wooden slats or scraps
- Felt
- Mod Podge
- Dr. Seuss Books
- Scrapbook paper


Any time there’s mod podge involved, prepare to get messy!


I started by cutting the random images I liked from Dr Seuss novelty books. Some of them couldn’t be cut in rectangles (because of other things on the page), so I simply cut around the image in random shapes. The quirkier, the better!
Next, I cut some polka dot scrap-paper to the dimensions of the wooden slat and pasted it on. Then I layered on the image with mod podge, and added some additional scraps here and there for fun. (You might notice, I added a little red glitter to my mod podge to make it sparkle!)


Finally, I used my glue gun to adhere satin turquoise ribbon, and to add some fun embellishments.


There are no rules here. Be as creative as you want!


Finally, I had a few images that were too big for my wooden slats, so I thought I’d try mod podging them to felt. Guess what? It worked perfectly! It just took a little longer to dry as the felt gets pretty soaked with mod podge.


And finally…Dr. Seuss’s Hat & Bow-Tie!
Finally, here’s how I ‘made’ the tree’s crowning jewel – the Cat in the Hat glittery hat and bow-tie.
I started with a Cat in the Hat costume hat and bow-tie, which cost me about $15. I went this route since I’m not a sewer, but if you are, I bet you could whip one up in no time. The only problem was that it looked like a costume (understandable, considering that it was one, lol). The fabric was flimsy and cheap. So I decided to give it some sparkle and structure by applying red glitter.
I ‘painted’ mod podge on over the red stripes, then brushed on red glitter with another paint brush. (I used Romantic Red glitter from Stampin Up, but I’m sure any one would do).


I’ll warn you, it was messy! I covered my island in paper, and used it to mix the sparkles around in the mod-podge covered brush. To dry the hat, I simply set in down over my paper towel holder! Within a couple of hours, it was dry and ready for the tree!.


Now, repeat the process with the bow-tie!

So…are you now ready to make your own Dr. Seuss Christmas decorations?


For lots more details and pics on The Dr. Seuss Tree, hop over here.
What are you waiting for?
Today is your day!
Your mountain is waiting.
So… get on your way.
~Dr. Seuss
Until next time, keep rhyming and glittering!
~ Kerri
P.S. I’m linking up with…


