This post was most recently updated on September 22nd, 2019
I’m smack dab in the middle of refinishing an old chair from my grandmother’s home.
This chair has sat in my basement for about 12 years, patiently waiting for some TLC. Through several moves, it has been loaded and unloaded; through several basement ‘purges’ it has survived. Each time I questionned why we were holding on to it, and each time a told myself: “I am going to do something with that chair some day!”
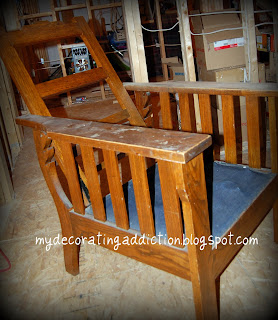
The chair is about 65 years old, and was made by my great-grandfather. From what I can determine, it is best described as a Morris chair. Wiki describes a Morris chair as “an early type of reclining chair.”
 |
| A modern version of the chair. Source: Wikipedia. |
Mine has all the design features of the Morris chair, which include “a reclining back and moderately high armrests, and a hinged back, set between two un-upholstered arms, with the reclining angle adjusted through a row of pegs, holes or notches in each arm.”
| Reclines by pushing the back through a series of arm notches. |
| Hinged back allows it to recline |
I knew I would one day refinish it because it has such sentimental value to me. I can’t remember a time when this chair wasn’t a fixture in my grandmother’s kitchen. I wish I had a photo of her kitchen to show you!
As a child, I always found it odd that she’d have a chair like this in her kitchen. She had a small kitchen by today’s standards, so functional space was at a premium. Yet, this clunky chair- which once had large home-made yellow/gold vevet(ish) seat and back cushions – was tucked in next to the fridge, at center-stage.
What I realize now is that this chair was really the heart of her kitchen. It was a comfortable perch after a home-cooked meal, and a place for guests to sit for a cup of tea. It made her kitchen a place where conversation and laughter could take place – two things she absolutely loved.
Now I can’t help but think what a nice idea that was. What if we all had reclining chairs in our kitchens? Perhaps a lot more communication might happen :-).
My plan has always been to re-finish the chair, and find a nook in my kitchen for it, just like she did. So over the past few weeks, I FINALLY made it a priority.
First I had to find seat and back cushions that would fit it. I assumed that I would have to get them custom-made (expensive), but lucked into finding two cushions for under $100 that will work perfectly.
 |
| Original varnish, and wear and tear. |
Next, I started in on the re-finishing – the fun part! It was originally covered with a thick, shiny clear varnish that HAD to go!
First I sanded with a electric sander, and then used sand paper in hard to reach places.
But the varnish was stubborn, so I decided that it needed primer. Once the chair was cleaned up with a Swiffer duster and then soap/water, I primed it with a latex primer.

And that is where it stands right now. Primed, and awaiting some shabby chic fabulous-ness.
My next step is the REALLY fun part – picking the paint and distressing/antiquing style. I’ve been searching for inspiration on my favorite blogs and design sites.
I am so excited to finally get this chair out of the basement.
Later this week, I’ll post the finished chair. I hope it turns out like I have always imagined!
Until next time, happy decorating.


